Friday, January 22, 2010

Banuffins!

A pair of bananas have been sitting on my kitchen counter for a week now, each day growing more brown and looking less appetizing. I know their secret though - let them go absolutely mushy and they will cooperate with sugar and flour so much more nicely.

While waiting for my bananas to ripen I've been browsing recipes for banana bread. I am accustomed to the type my mother used to make - a dense, moist loaf studded with walnuts and browned perfectly on top. However, when I recreate the recipe I never seem to get it quite right, and I often find a little bite of bitterness in there, possibly from the baking soda. I'd also like something lighter and fluffier - something cuter to look at, perhaps?

I came across this recipe at British Cream Tea and thought I would give it a go. It uses self-rising flour instead of soda and rolled oats for a difference in texture. I made just a few changes - regular granulated sugar instead of caster sugar, I doubled the recipe since I had 2 bananas instead of one, added a good shake of cinnamon since I can't do without it, reduced the liquid (um, accidentally), and poured the batter into my new silicone baking cups rather than a loaf pan. I also got the opportunity to use my new food scale for measuring which had me absolutely giddy (I really shouldn't get so excited over new kitchen toys).


They turned out just as I wanted them to - fluffy and light, slightly sticky, but not too sweet, and absolutely devour-able.

Banuffins

250g self-rising flour
150g granulated sugar
80g rolled oats (plus more for sprinkling)
1/2 tsp cinnamon
2 eggs, lightly beaten
2 large, overripe bananas
1/3 cup milk
5 teaspoons of vegetable oil

Preheat oven to 400°F. Grease 2 small loaf pans, 1 medium loaf pan, or baking cups.

In a medium bowl mix flour, sugar, oats and cinnamon. In a separate bowl mash bananas with a fork, then add eggs, milk and oil. Add wet ingredients to dry, stirring only enough to combine. Don't over mix.

Spoon mixture into pan/tins, sprinkle rolled oats lightly across the top. Bake for 20 minutes until golden brown.

Eat finished product immediately and hide the evidence. There's no reason why you should share.

xoxo

me

Sunday, January 17, 2010

Healthy snackies

Last night Sissy and her Fancy came over (Fancy is seester engagement slang). The boys watched football while we paged through bridal magazines, and then later the two of us left for the mall and spent way too much time and waaay too much money. But hey, we don't get much time to spend together anymore, so we can easily justify all of that shopping!

Rewind to earlier that day. With guests coming over we needed some snacks, but I didn't want to spend a lot of time preparing them. The perfect chance to make one of the recipes on my to do list!


Crunchy roasted chickpeas are quite popular with the food bloggers right now, and there is a good reason why. They're quick, easy to prepare, can be tailored to anyone's tastes, and they're de-lish. They are similar to corn-nuts in texture, but without all of the oily/salty blechiness that makes them not feel like a healthy snack at all. The chickpeas use just a bit of oil and salt and are relatively guilt free. They can be seasoned with whatever spice mixture you like, but just be sure to dry them thoroughly before roasting them.

Crunchy Roasted Chickpeas

2 15oz cans chickpeas (garbanzo beans)
1 Tbsp lime juice
2 Tbsp olive oil
1 Tbsp garam masala powder
1 Tbsp smoked paprika
1 Tbsp kosher salt

Optional serving idea -

1 cucumber, diced finely
1 serrano or jalapeno chili - seeded and finely chopped
1/4 cup red onion, diced finely

Drain chickpeas and rinse well. Blot with a paper tower to remove as much water as you can, then sprinkle with lime juice and leave in a colander for an hour or two if you have time. If not, just keep blotting with paper towels and try to get them as dry as possible.

Preheat oven to 400°F.

When chickpeas are dry mix together remaining ingredients in a medium bowl to form a paste and then toss chickpeas very well so that they are coated. Spread evenly across a roasting pan or baking sheet lined with parchment paper, and bake at 400°F for 45-55 minutes, stirring once halfway through. At 45 minutes begin checking on them every few minutes to be sure they aren't burning - the gap between being crunchy all the way through and being burnt is very small.

If desired, toss with optional ingredients and serve, or just eat them plain by the handful!

Chickpeas are best eaten the day of cooking, but can be kept in an airtight container for a few days. Keep in mind, if you store them they will lose much of their crunch.

xoxo

me

Wednesday, January 6, 2010

Lull

It's the first week of the new year, and unsurprisingly the restaurant is dead. I'm sure pretty much everyone in the industry is feeling the exact same lull in business right now. Every year, the same thing. People are strapped for cash after the holidays and with New Year's resolutions still fresh in their minds even the ones who do come into our store tend to eat lighter and less expensively. For people who are still in the mood to eat out though, this is a great time. No crowds, cash hungry waiters falling all over you, and specials designed to draw customers in such as extended happy hours and prix fixe dinners.

In this quiet time in my job I get to come in little later, leave a little earlier, and be a little less stressed out. Of course, my sales are laughable by last months standards, but that's what happens when you work in a seasonal industry. I enjoy the extra time to spend in the kitchen, but now that I'm on a tighter budget I need to get a little more creative with my ingredients. Thankfully I was able to stock up my pantry last week and since my CSA is still delivering plenty of seasonal food (granted, some of it sourced from organic farms down south a little farther) I might possibly be able to squeak through the grocery store without picking up anything other than the toddler necessities.


In my opinion the best types of dishes to make in such situations are curries, stews, casseroles - homey, and comforting, if a little less refined. The preparation can be as simple and lazy as you make it. The perfect choice for a busy work week, or a lazy day spent on the couch.

This particular dish was invented to use up a few things in my fridge. Just follow the same basic steps and add whatever you want to it - change the ingredients entirely, but it will still be as easy.


Cook alliums (onion, garlic, shallot, leeks) and meat/veg protein in a little oil until they begin to color slightly. Add vegetables that need to be cooked through (make sure they are all chopped to the same sized dice), and add salt, pepper, and a little hint of spices of your choice, stir for a few minutes. Add flavorful liquid (pre-made soup, or stock, or even coconut milk). Bring to a low boil, cover, reduce to a simmer and give it 15-20 minutes, or whenever your most dense veggies are soft. Then add the ingredients that need only a minute of cooking - greens or herbs. Give it a couple of minutes on low heat for your fresh ingredients to soften, then serve with rice, bread, quinoa, crackers, whatever. And voila! A steaming hot bowl of yum.


For my dish I used a little yellow onion and garlic with a 5 grain tempeh. Then I added peeled potatoes, turnips, baby yellow carrots, and an apple. For the flavoring I used kosher salt, black pepper, a dash of cayenne, and about a teaspoon of curry powder. My liquid choice was a premade butternut squash soup - about 2 cups of it. It took 20 minutes for my veggies to cook and then I topped it off with some shredded swiss chard. The curried squash soup base goes really well with jasmine rice.

xoxo

Me

Friday, January 1, 2010

Right start for a fresh start

Happy New Year!!

2010. Wow.

My brain can't even handle that number, but hey, another new year is another new year. A fresh page to start on. Another 4 seasons to weather... and another 4 seasons of food to eat! My favorite part of course. Now I get to start looking forward to radishes and baby lettuces and pea vines and all the little crispy, crunchy things and sprout-y green stuff of spring.

But I'm getting ahead of myself. It's only New Year's day, and still quite winter-y out, and while it is time to think about all the great things that lay ahead in 2010 I should be working out how I'm going to get myself there. I'm always a fan of New Years resolutions. Sticking to my limits makes me feel good, although I can only remember one year in particular where I kept my resolution the whole 12 months. This year I feel like there are so many things I need to change and work on that it's hard to settle on any specific resolutions.


One thing that I really should resolve to do, but I know I'd never stick to is to eat breakfast every day. I've never ever been a breakfast person - in fact, oftentimes it makes me feel sick to even smell food in the morning. I typically don't have my first meal until 1 PM. But with a loss of energy during these colder, darker months, and a need to cram more vitamins into my diet, breakfast is starting to sound better. So day 1 of the new year, I made a delicious, healthy, energy packed breakfast with the hopes that it would inspire me to be a little better to myself all through the year.


No need for a recipe, its too simple for that. Just oats simmered with dried cranberries, cardamom and a cinnamon stick. Pour a little milk on when it's done and top it with dates, oranges or grapefruit, and some crushed pistachios. Or use whatever fruit and nut combo you have on hand.

xoxo

Me

Thursday, December 31, 2009

2010!

Ok, 2010, here I come with my completed list of dishes to make before 2011.

Malaysian Roti Jala (Net Bread)
Homemade cheese of some kind
Kuih Bahulu
Jasmine Rice Pudding with Mangoes
Pocky
Tortillas
Vegetarian Tamales
Shoyu Tamago
Crunchy Roasted Chickpeas
Dandelion Bread
Vegetarian Big Macs (for Ryan of course)
Matcha Shortbread
Real actual bread with yeast and everything
Thalipeeth
Spinach and Wild Mushroom Souffle
Falafel Pitas with Cucumber-Yogurt Dressing
Crepes
Fried Plantains
Pasta of some kind?

Wish me luck!

xoxo

me

Tuesday, December 29, 2009

Fresh start, coming right up.

A new year and a new decade start in just a couple of days. New Years is never a big deal for me, in fact, I volunteered to close the restaurant this year and will probably be at work until 12am or later. But it is nice to have a little time for reflection and goal-setting. Well, and for wondering why it's 2010 already and I don't own a hover car or a house on the moon.

My goals for this year involve budgeting, and organizing and getting better at focusing on my projects. Essentially, un-cluttering my life from all perspectives so that I'll have a little more room for creativity. I started early by re-organizing the whole kitchen, and it got me thinking about what goals I need to set for myself in the kitchen for the next few months. Some new products to use, some new recipes, new techniques. I'm excited to be making time for cooking again!

So, wondering what I'm excited about? Well, I'll tell you anyway. For Christmas my wonderful family who treats me to so many goodies to use in the kitchen gave me some new toys, most notably a mandoline slicer and an 11 cup Cuisinart. I also got a food scale and a dough scraper, some adorable molds for cupcakes and petits fours, and lots of food products to try - truffle cream, balsamic/fig syrup, cheeses and salts and snacks and so on! There's so much I want to make right now I thought I'd compile a list and try to make everything on it by the end of the year. If anyone actually reads this, try to hold me accountable, ok?!

Malaysian Roti Jala (Net Bread)
Homemade cheese of some kind
Kuih Bahulu
Jasmine Sticky Rice with Mangoes
Pocky
Tortillas
Vegetarian Tamales
Shoyu Tamago
Crunchy Roasted Chickpeas
Dandelion Bread
Vegetarian Big Macs (for Ryan of course)
Matcha Shortbread
Real actual bread with yeast and everything

I will add to this list over the next couple of days before the new year, and will include recipe links as I check them off.

Happy New Year!!

xoxo

me

Friday, December 11, 2009

Back.

Took a break. A long break. Didn't feel like writing much, and didn't have much time to cook either. But the mood has struck again, and maybe it will stick around for at least a little while.

So what's going on right now... well, it's winter. No snow yet, and none on the forecast, sadly, but it's been in the 20's and below all this week. Usually I'm quite alright with that, but during last summer's heat wave the heat seals melted on our computer and now if the temperature around it reaches a level that is, say, comfortable to humans, it shuts itself off. So here we are, it's 22 degrees outside, and the compy is propped up on the windowsill next to me with the window cracked and a vicious draft coming in. If anything it's a blessing in disguise because it keeps me from sitting at the computer for too long.

Anyway, back to food.

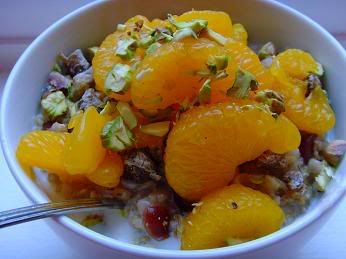
This week I've been experimenting with various recipes for this or that, hoping to find something cheap and easy and at the same time pretty and unusual to give out as gifts for Christmas. My coworkers are my guinea pigs and they were treated to 3 dozen cookies a few days ago. They were all delicious, but they didn't quite meet my gift requirements.

The next item on my list was some form of candied citrus peel. The basic idea is this: peel the citrus and scrape off some of the pith, then blanch, boil in sugar syrup, dry, and roll in sugar or dip in chocolate. But while looking for recipes I noticed that every site I went to suggested a different number of times to blanch, amount of time for blanching, thickness of pith to leave on the peel, etc., and some recipes did not recommend blanching at all. I could spend anywhere from 1 hour to 2 days preparing the candy. So, I decided to go with a rather time intensive, but easy method, and then I would continue with trial and error from there if it didn't work out. And what do you know, the first try was a pretty good success.


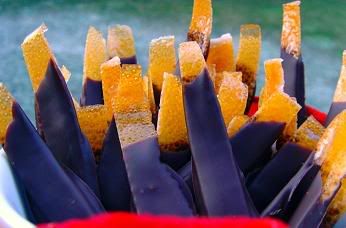
I found this recipe on Unfussy Fare which was originally from The Joy of Cooking. The unique aspect of this method is that it uses salted water to remove the bitterness from the citrus peel rather than repeated sets of blanching. No saltiness is retained in the final candy.

Grapefruit-ettes

2 medium pink grapefruits, with lovely skin
Salt
2 cups sugar
1 tbsp fresh lemon juice
water
6oz 70%+ cacao chocolate

Trim the peel off the grapefruits. To do this slice a little off the top of both ends to give yourself a flat surface to hold them in place while you slice off the peel. Cut the peel off, vertically, taking off plenty of pith, but not cutting so close that you get any of the fruit. You should be able to do this with about 6 slices. This is all much more easily explained with pictures of course, but I forgot to take any, so if I do attempt this again I will snap some photos and put them in the post. Cut each big piece off peel in half lengthwise (this allows you to press them flat, which makes it much easier to trim off the pith). You should have slices about 1" thick. Press them flat, peel side down, and use a very sharp knife to skim off as much of the bitter pith as possible. Don't worry, some will remain, and you want there to be a little bit anyway, otherwise they won't have much chewiness to them. After trimming the pith cut each piece again lengthwise so that you have little strips about 3-4 inches long and 1/4 to 1/2 inch wide.

Put the peels in a bowl, and cover with water, about 3 cups. Add 1 teaspoon of salt per cup of water. Cover with plastic wrap and let sit at least 24 hours. Then drain and rinse the peels and soak again in fresh water for 20 minutes. Bring another few cups of fresh water to a boil, add peels, and boil for 20 minutes, draining again.

Mix together 2 cups of sugar and 2 cups of water in a saucepot and bring to a boil. Add peels, reduce heat to a low simmer, and let simmer for 45 minutes until peels are translucent. If you left the pith especially thick you may boil up to an hour and 15 minutes.

Remove peels from syrup one at a time using a fork or slotted spoon and place on a rack overnight to dry. Make sure you put something underneath to catch the syrupy drips.

Once peels are perfectly dry you may do 1 of two things. Toss them in a big bowl of granulated sugar, or leave the sugar off and dip them in chocolate. If you intend to sugar them just throw a cup or two of sugar in a plastic container, add the peels and shake, and then you can simply put the lid on and tuck them away - the extra sugar adds to their shelf life. If you want them chocolate-y just melt 6oz of good, dark chocolate (I prefer at least 70% cacao) in a metal bowl over a pot of simmering water (make sure the bowl doesn't touch the surface of the water), and dip the peel in, leaving a little tip sticking out as a handle. Lay them on parchment paper, refrigerate, and then store in single layers between sheets of wax paper in an airtight container. If you allow them to sit out in the air the chocolate will get a white bloom on it and they won't be so pretty.

Now I tried these rolled in sugar, and let me just say that I thought I had ruined a whole batch of citrus peels. This was my first time trying candied citrus peels and I wasn't expecting them to be so firm and slightly bitter still. The sugar did nothing to counter-act that feeling that I was chewing on gross grapefruit peels, and I felt like I had been tricked somehow into eating something I normally throw away. But I did like the slight grapefruit flavor, and I had bought chocolate just for the occasion, so I melted just one tiny square in the microwave, dipped the shortest peel in it, and let it cool in the fridge. 10 minutes later I took an apprehensive bite, and found that it was delicious! The strong flavor of the dark chocolate hid the slight bitterness well, and it perfectly complimented the citrus-y flavor, while also adding a softer texture to my too-thin peels. So if you have your heart set on traditional candied and sugared peels, but aren't sure if you're going to like them or not, keep some chocolate around just in case.

xoxo
Me